13 Hairstyles That Actually Hide Thinning Hair (Real Before and Afters)
Thinning hair sneaks up in strange ways. It’s rarely the whole head at once. More often it’s a part line that looks a little wider than it used to. Or a crown that used to hold curl and now falls flat by noon.
The good news is that a few smart choices in the chair can change everything. A shadow root instead of an all over color. Bangs cut to fall at the right angle. Layers that start high instead of low. None of it means cutting off length you’re not ready to lose.
This roundup pulls together 13 hairstyles that actually hide thinning hair. They’re gathered from real cuts on real heads, not studio photos or filtered mockups. Some lean on volume and big curls. Some lean on color placement. A few use nothing more than a smarter part.
What they all have in common is simple. The fullness gets built exactly where thinning shows first, at the crown, along the hairline, and around the face. Scroll through, save what fits your length, and bring a photo to your next appointment.
1. The Layered Shag Cut That Turned Flat, Thin-Looking Hair Into Full, Bouncy Hair
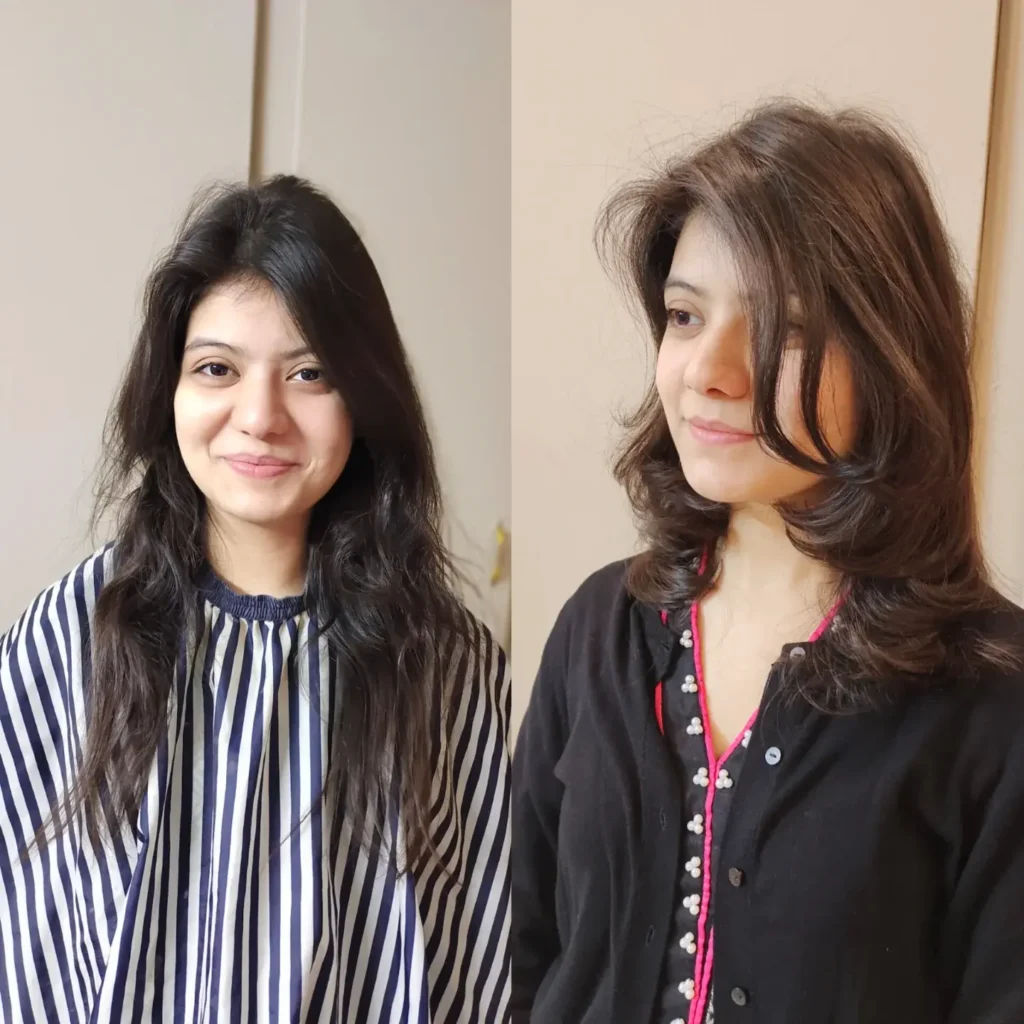
The before photo tells the real story. Long, one-length hair with almost no shape, hanging flat from a center part with barely any lift at the root. That kind of length looks pretty, but it’s the number one reason thinning hair gets more obvious as the day goes on. Weight pulls hair down and flat, and flat reads thin no matter your actual hair count.
The after is a shorter, heavily layered cut landing around the shoulders, blown out with a round brush for lift at the crown and soft, flipped-out ends. The face-framing pieces are cut shorter too, which adds a second layer of movement right where thinning usually shows first, along the part and hairline.
If you’re booking this cut, ask your stylist for layers that start high, near the crown, not just at the ends. That’s what creates the actual volume, not the length you cut off.
Long, one length hair, flat at the crown, weighed down with almost no movement.
Shoulder length layered shag, root lift at the crown, soft flipped out ends and face framing pieces.
2. The Root Shadow and Wave Combo That Tricks the Eye Into Seeing More Hair
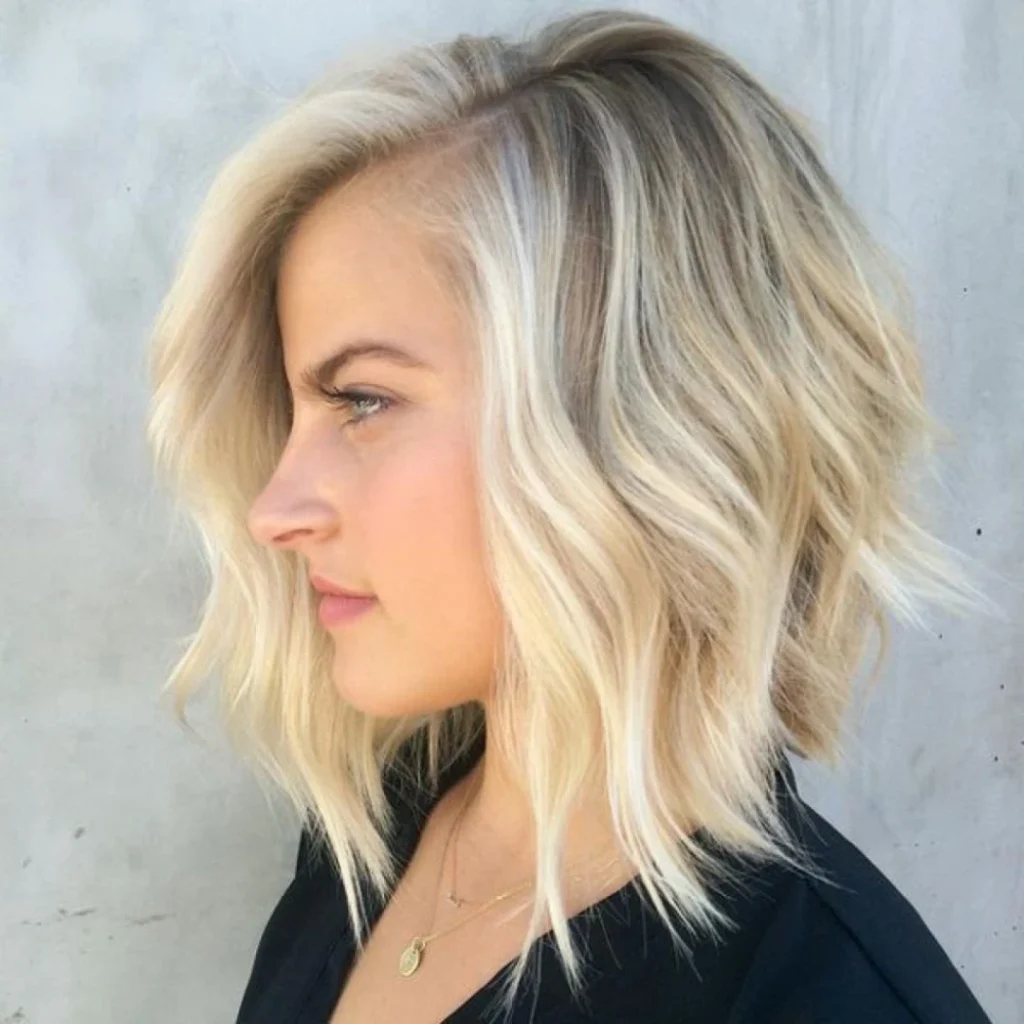
This one is all about color doing the heavy lifting. A darker root fading into bright, warm blonde ends pulls the eye down and out, away from the scalp and part line where thinning usually shows. Loose beachy waves add texture on top of that, so light bounces around instead of sitting flat on strands.
A few things worth copying here:
- Deep side part instead of center part, it hides the widest area of scalp naturally
- Root color kept a shade or two darker than the ends, so any visible scalp blends instead of standing out
- Jaw to collarbone length with an angled front, shorter layers add lift without cutting off too much length
- Loose waves set with a curling wand or wave iron, not tight curls, tight curls actually show more scalp between sections
Ask your colorist for a soft shadow root, not a hard line, so it grows out gracefully too.
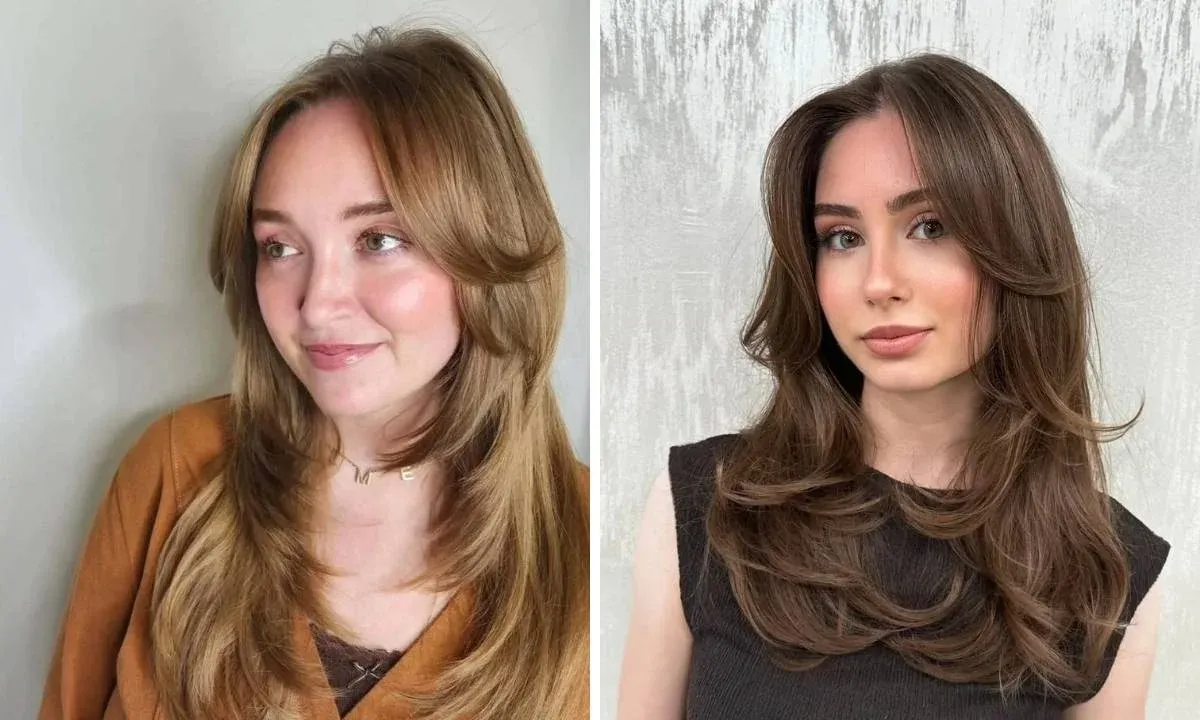
3. The Center Part That Doesn’t Show Scalp, Thanks to These Face-Framing Layers
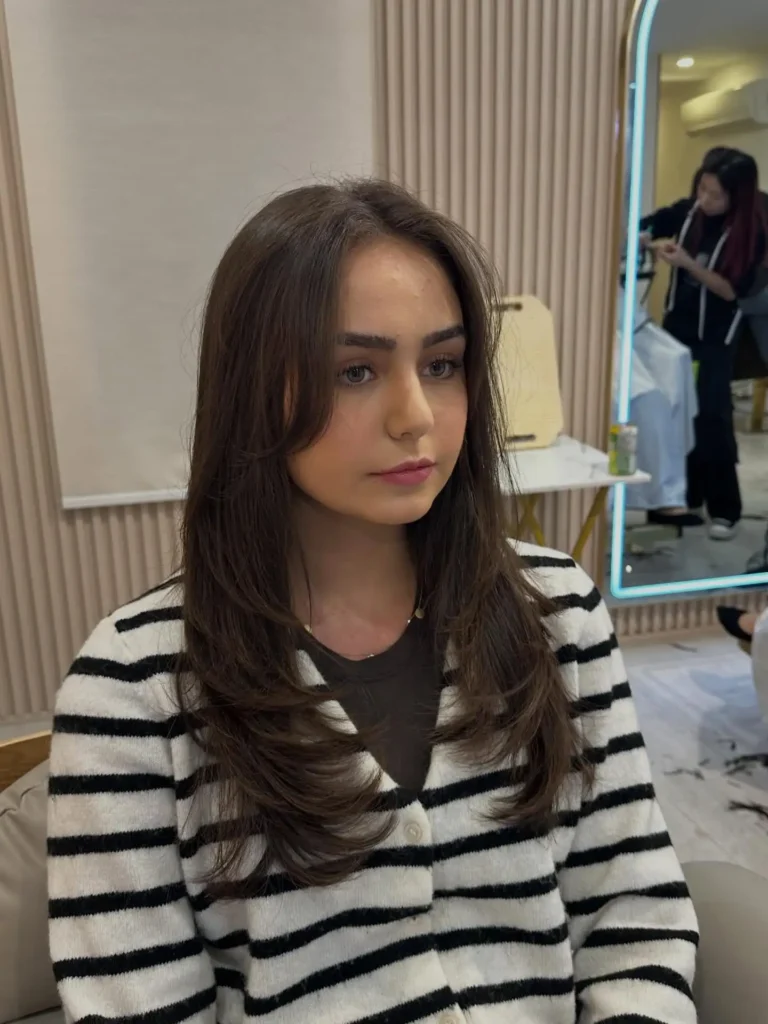
Center parts get blamed for exposing thinning spots, but the part itself isn’t usually the problem. It’s how it’s cut and styled. Here, the front pieces are cut long and layered starting high, right where the part begins, so hair falls forward and across instead of straight down each side. That forward motion covers the part line without anyone noticing it’s doing double duty.
The rest of the cut is long face-framing layers that curve outward at the ends, giving the whole style a soft, rounded shape instead of one flat curtain of hair. Deep brown tones like this one also help, darker hair reflects less shine off the scalp than very light colors do, so any small gaps blend more naturally.
To recreate it:
Ask for face-framing layers that start above eyebrow level, not lower.
Round brush the front pieces forward and slightly across the part while blow drying.
Finish with a flat iron flip at the ends for that soft outward curve.
4. The Deep Part and Glass-Sleek Finish That Makes Solid Dark Hair Read Twice as Dense
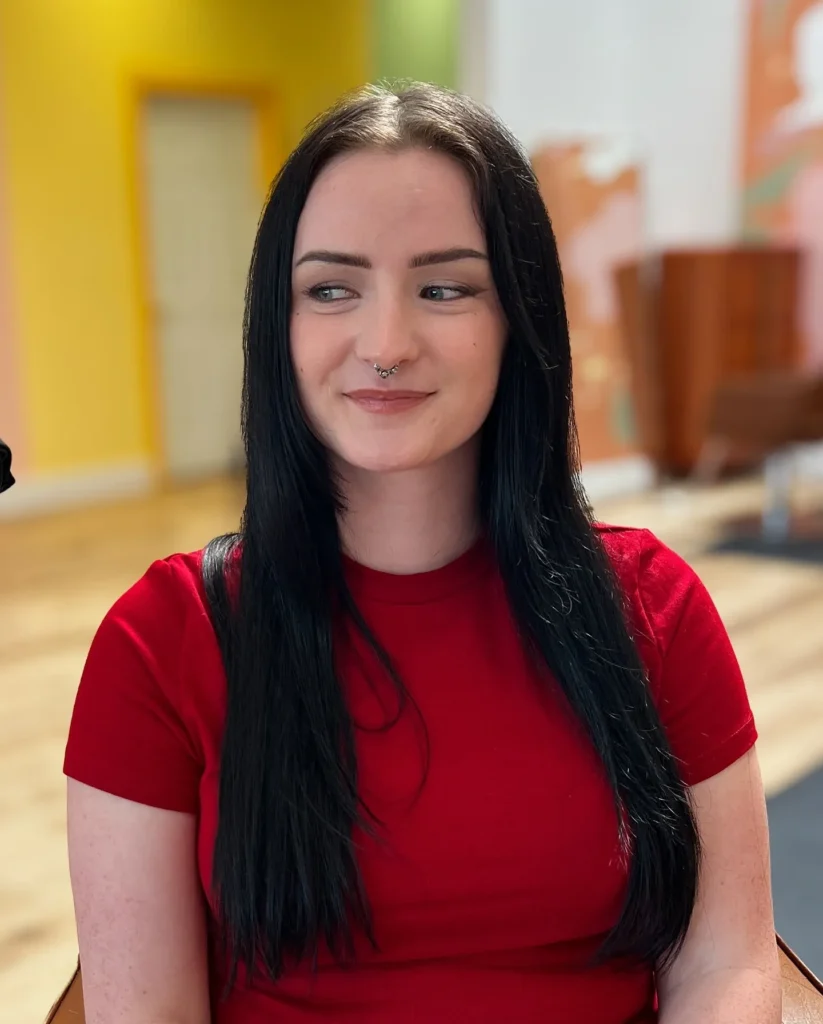
Sleek straight styles are a gamble for thinning hair. Get the finish wrong and pulling everything flat and tight can expose more scalp, not less. Get it right, like here, and it works in your favor. This look uses a deep, slightly off-center part instead of a dead-center one, jet black one-length hair ironed pin straight, and a glossy, glass-like finish where every strand lies close to the next.
The color is doing quiet, important work. True black absorbs light instead of bouncing it, so any thin patches near the scalp don’t catch shine the way lighter colors do. And because the strands lie flat and close together with no flyaways, the eye reads it as one dense sheet of hair rather than individual pieces with visible gaps between them.
⚠️ Watch Out
Slicked-back, tight sleek styles can backfire and show more scalp than they hide. Use a lightweight smoothing serum and a flat iron, not a brush and heavy gel, to keep the shine without the tightness.
Not every hair type will hold this finish easily, but if yours does, it’s one of the lowest-effort options on this list once you’ve got the technique down.
5. Curtain Bangs With Undone Root Volume, the Fastest Fix for a Receding-Looking Hairline
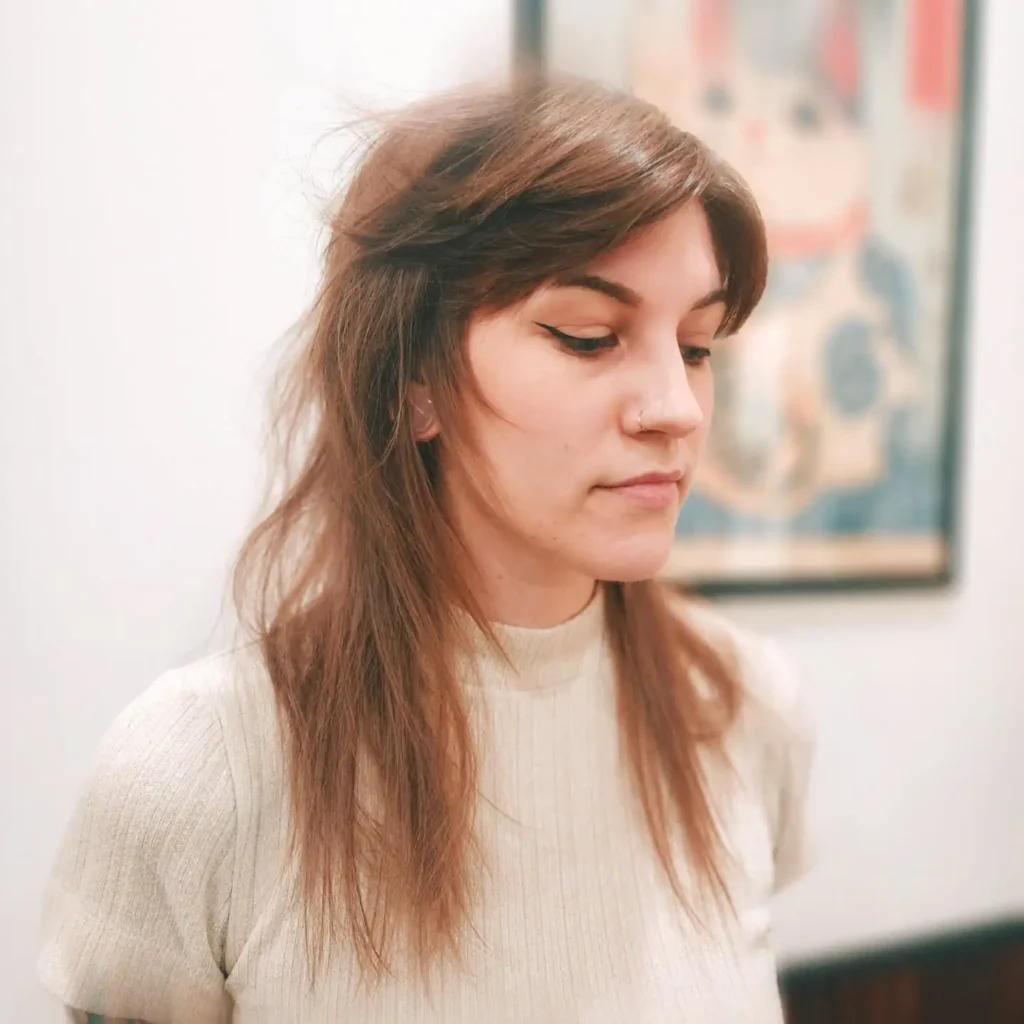
Curtain bangs get overlooked because people think of them as a bold, all-in change. They’re actually one of the gentlest tricks on this list. Cut long and swept to both sides from a deep center part, they fall forward and soften the hairline instead of pulling attention straight up to it. Paired with tousled, lifted roots and loose waves through the length, the whole front section reads full and a little undone, which hides gaps far better than anything sleek or pulled back.
What makes this particular version work is the texture. The ends are left slightly piecey rather than blunt, and the roots have visible lift instead of lying flat against the scalp. Piecey, lifted hair scatters light. Flat hair concentrates it right on the scalp.
Root lift plus long piecey curtain bangs covers the hairline without a single inch getting cut off.
Blow dry the roots with a round brush lifting away from the head, then let the bangs fall naturally. Skip the flat iron here, it kills the exact texture doing the work.
6. Money-Piece Highlights That Frame the Face and Distract From Everything Else
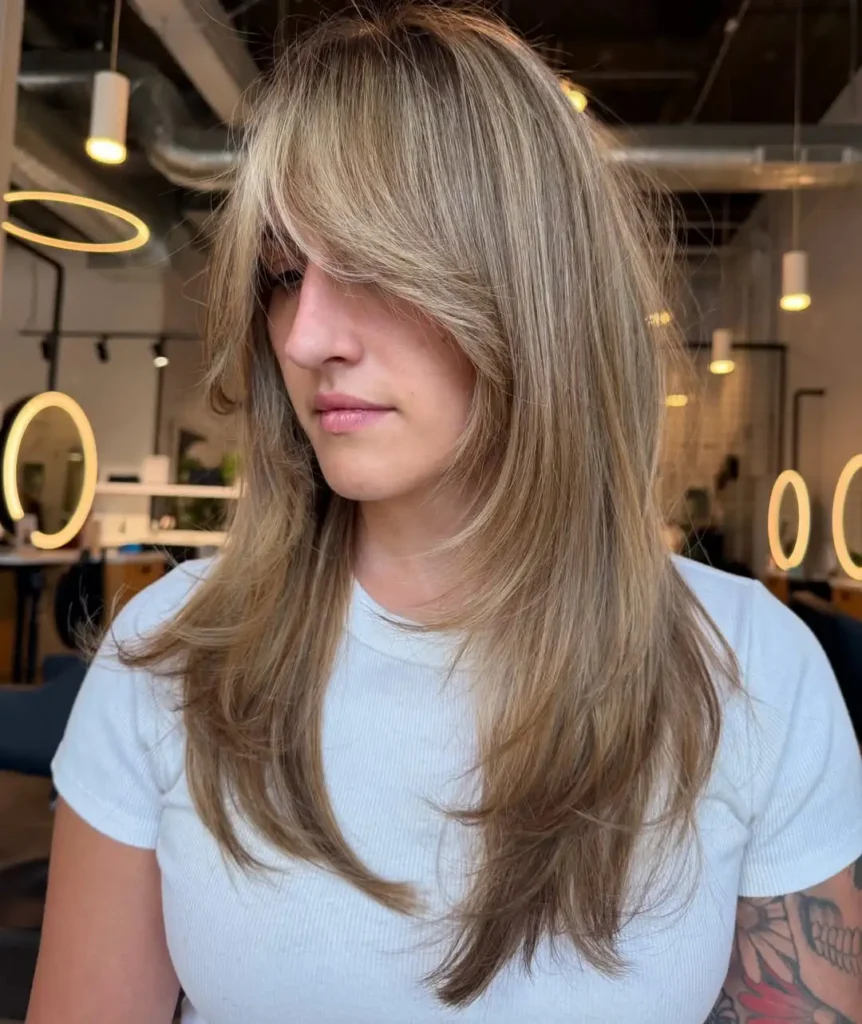
Notice where the lightest color sits in this photo. It’s concentrated right around the face, in the pieces that fall forward from a deep side part, not scattered evenly through the whole head. That’s a technique called face-framing or money-piece highlighting, and it works for thinning hair because it gives the eye somewhere obvious and bright to land, well away from the crown or part line.
The rest of the hair stays a warmer, deeper blonde base, so the contrast does the work rather than an all-over lightening that would just make thin spots more visible everywhere. Long layers cut through the length add movement and keep the ends from looking stringy, which matters just as much as the color placement.
Ask your colorist for face-framing money pieces specifically; it’s a smaller, cheaper service than a full head of highlights and gives more payoff for hiding thinning than an even, all-over lightening would.
7. The Big Bouncy Blowout That Hides Thinning With Sheer Volume, Not Just Clever Parting
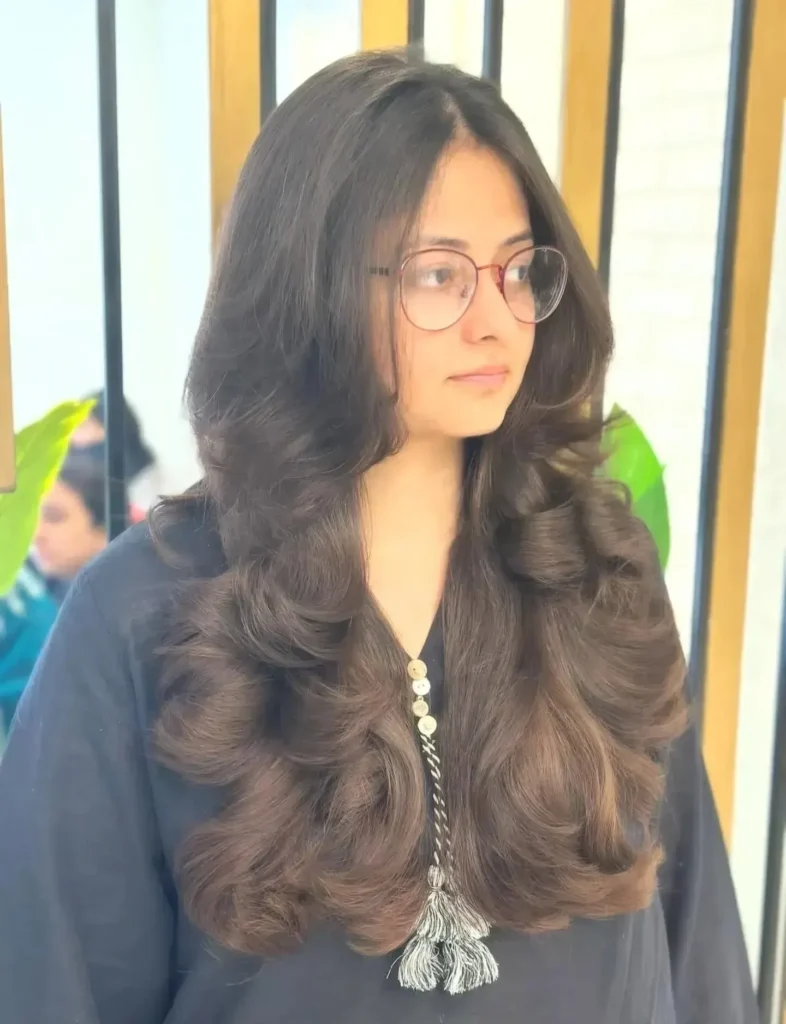
Some entries on this list work through color or parting tricks. This one works through pure volume. Every section of hair here has been curled outward into big, soft C-shaped curls, from root to tip, giving the whole head a rounded, full silhouette instead of hair that lies close to the head. When curls this size stack on top of each other, they create actual physical lift and width, so there’s simply more visual mass covering the scalp at every angle, not just at the crown.
This is the most high-effort style on the list so far, but it’s also the most forgiving. Because the curl pattern is consistent everywhere, there’s no single spot doing all the work and no risk of one section falling flat and giving you away.
What you’ll need
Curl away from the face in even sections, brush through gently once cool, and resist the urge to skip the root area, that’s where most of the volume actually comes from.
8. Swooped-Back Crown Layers That Add Lift Without Losing a Single Inch of Length
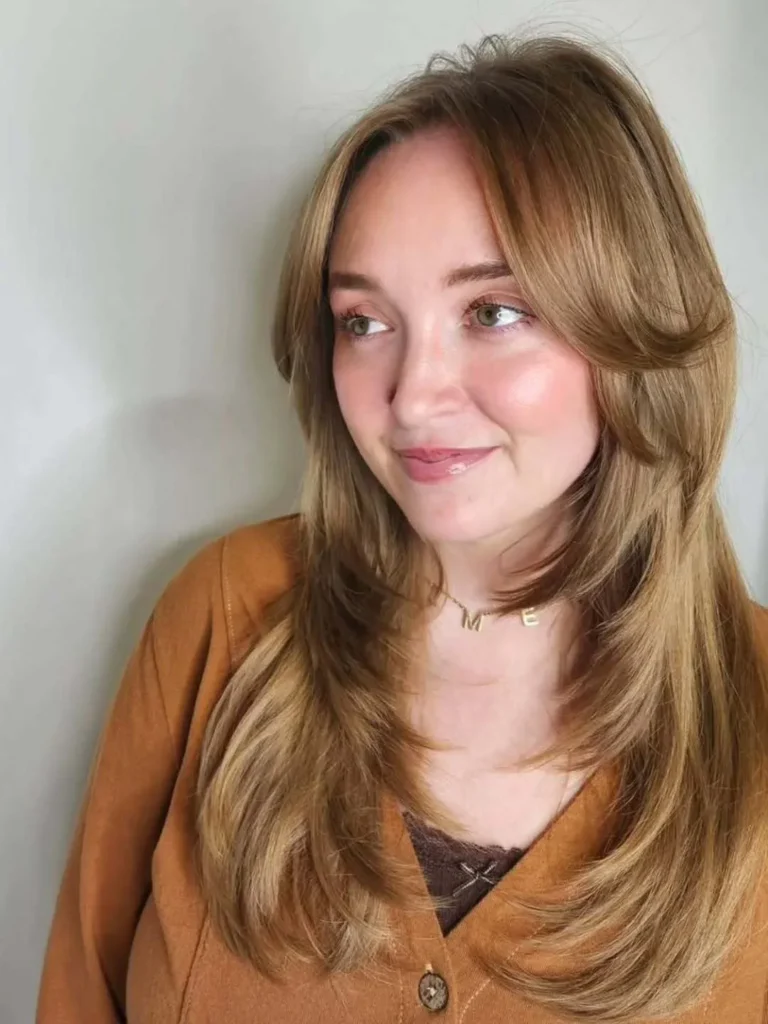
Golden warm tones and long layers cut in a swoop pattern, starting around cheekbone height and curving back and out toward the ends. That swoop direction matters more than people realize. Layers cut to sweep back and away from the face push volume up and outward at the crown, exactly where thinning starts to show first, without shortening the overall length the way a full haircut would.
The warm caramel and honey tones threaded through the mid-lengths also catch light unevenly on purpose, which breaks up any flat, see-through patches instead of letting them sit in shadow against darker roots.
| Swoop layers | Blunt one length |
|---|---|
| Lift and movement at the crown | Flat, weighed down crown |
| Length stays nearly the same | Length only, no built in lift |
| Needs a round brush or hot tool to activate | Air dries flat with no effort |
If your stylist tries to talk you into a full round layer cut instead, ask specifically for swoop or face forward layers. It’s a smaller, more targeted change with a bigger payoff at the root.
9. The Curved-Under Ends and Face-Framing Curls That Make a Round, Full Frame Around the Face
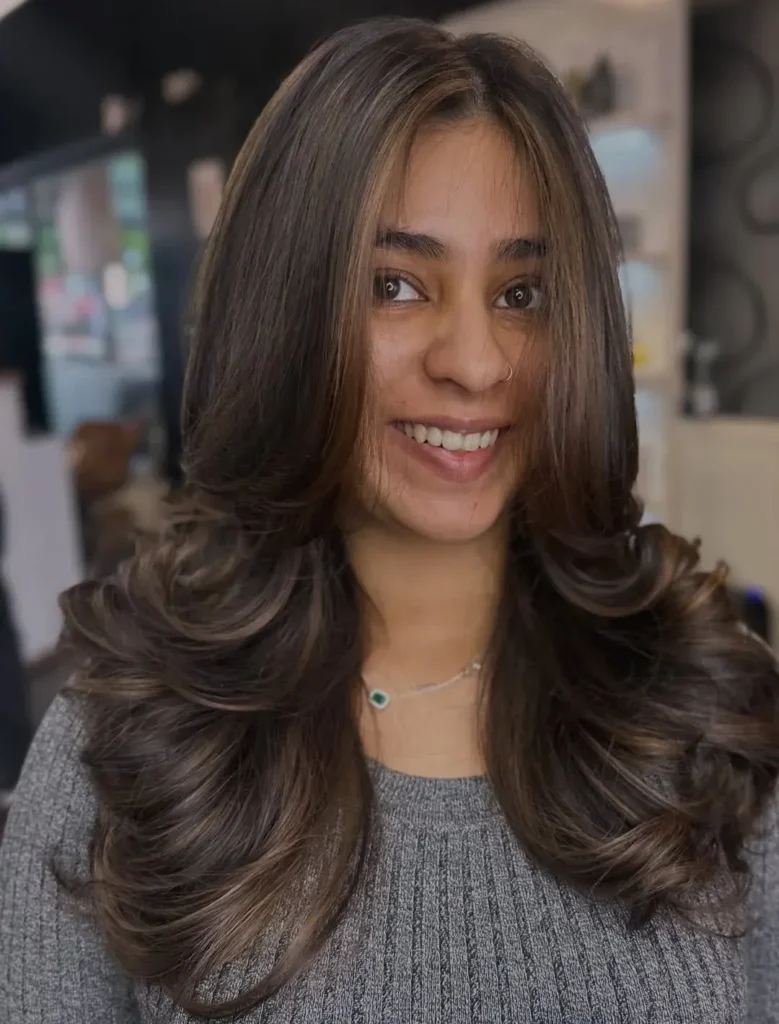
Look closely at where the fullest, roundest part of this style sits, right at the jaw and cheek, exactly where a face needs the most visual weight to balance a thinner-looking crown or part. The layers are cut short enough to curve inward and under with a round brush, creating two soft curls that frame the face like parentheses. Everything below that continues in loose, bouncy waves, so the fullness doesn’t stop abruptly, it tapers naturally down the length.
What works here:
- Face-framing layers cut to chin or jaw length, shorter than the rest of the hair
- A round brush blowout curling those pieces under and inward, not away from the face
- Warm brunette base with subtle caramel pieces woven through for dimension
- Glossy finish, shine reflects light evenly and makes hair look thicker than a matte finish does
Curl face-framing pieces under, toward the face, for a rounded finish.
Add a glossing treatment to boost shine and reflect light evenly.
Curling ends away from the face, it opens up the crown instead of framing it.
Matte styling products, they flatten shine and make hair look thinner.
10. Wispy Curtain Fringe and Loose Waves That Build Volume Right at the Root
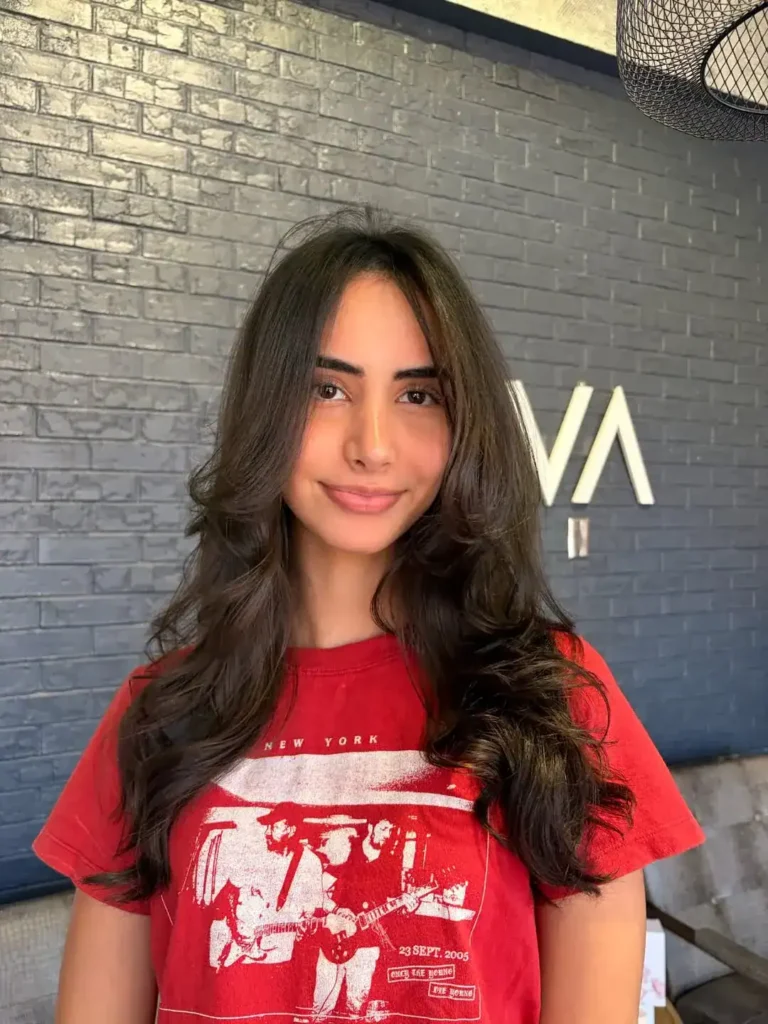
Volume starts here, not at the ends.
The front section is cut into a soft, wispy fringe that splits and sweeps both directions from a high point at the crown, giving lift exactly where hair typically flattens first. From there, loose waves take over through the mid-lengths and ends, keeping the fullness going instead of the volume trailing off into thin, straight pieces.
What’s doing the work in this one:
- A wispy, not blunt, curtain fringe cut with texturizing shears
- A high starting point for the part, close to the crown itself
- Loose waves set with a one-inch iron, wrapped away from the face
- A glossing serum smoothed through mid-lengths only, to keep the roots from looking weighed down
This is a good option if you want something that reads as effortless rather than done, since the wave pattern hides small imperfections in a way a sleek style never could.
- ▸Wispy curtain fringe, cut with texturizing shears
- ▸Part started high, near the crown
- ▸Loose waves wrapped away from the face
11. Face-Framing Layers That Flip Out at Three Different Points Down the Length
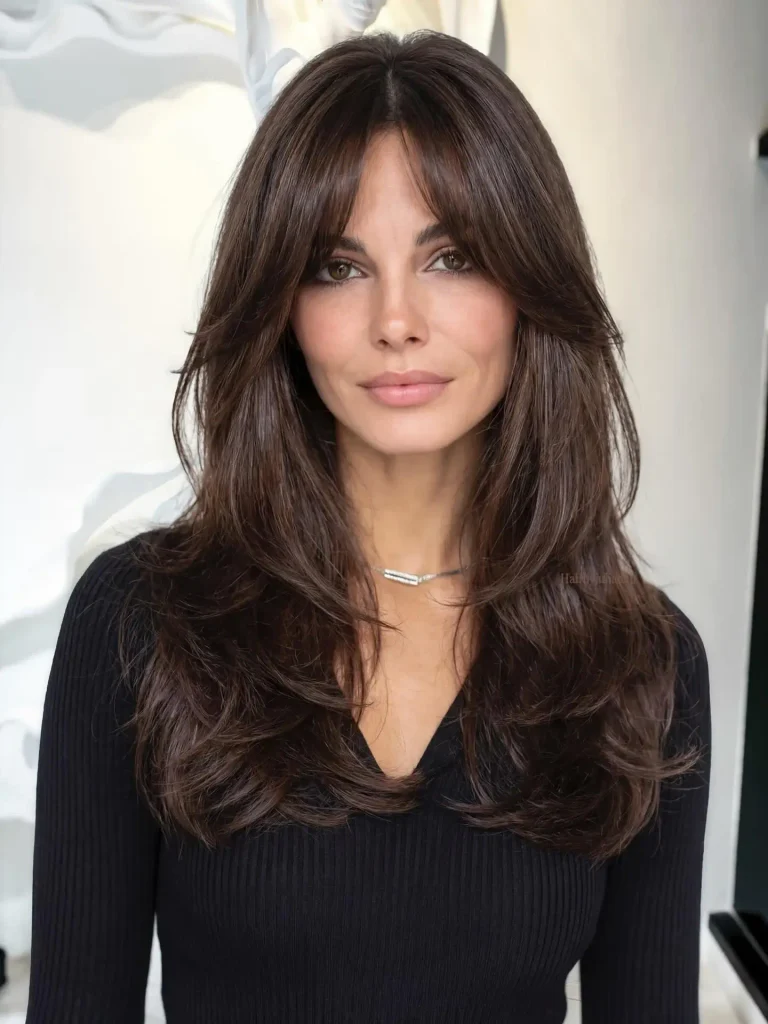
Look at where this cut breaks and flicks outward, not just once at the ends, but at the jaw, again past the shoulder, and once more at the very bottom. Each flip point acts like a small burst of volume along the way, so instead of one area doing the work of hiding thinness, there are three separate spots breaking up the surface of the hair. The soft, wispy fringe blends straight into those layers rather than sitting as its own separate piece, which keeps the whole front section moving instead of looking cut off.
The color helps too. Rich, glossy brunette with just a hint of warmth catches light evenly across the flipped sections, so no single spot looks flatter or thinner than the rest.
Give your stylist a photo of this exact layering pattern, this is one where a small difference in where the layers land changes the whole effect.
12. Horizontal Layering That Stacks Fullness in Rows Down the Length
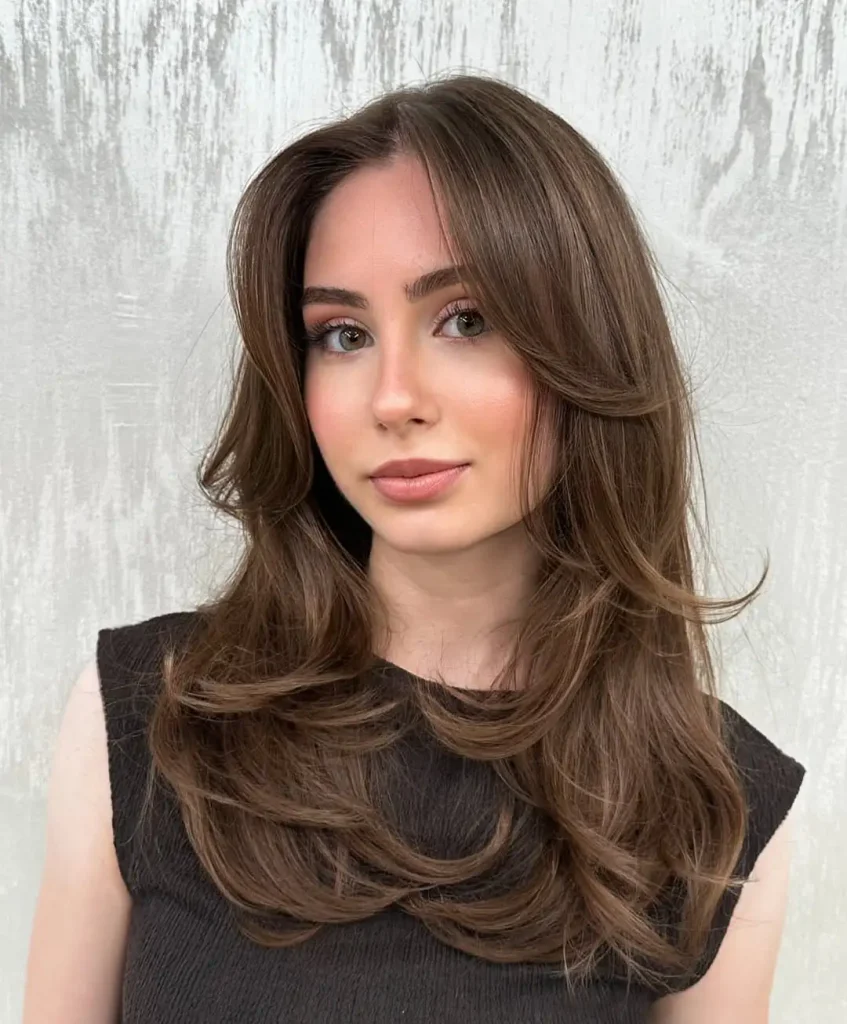
Most of the styles so far build volume at the crown or around the face. This one takes a different approach and builds it in stacked rows all the way down the hair, almost like scallops. Each layer is cut to curve under and catch the layer beneath it, so from a distance the whole length reads as a series of soft, rounded shapes instead of one flat sheet falling straight down.
A soft center part keeps things balanced, and subtle caramel balayage woven through a chocolate brown base adds dimension without going for high contrast, which keeps the eye moving across the surface of the hair rather than settling on any one thin-looking area.
📌 Good To Know
This layering pattern needs a round brush blowout to hold its shape. Air drying flattens the rows out fast, so it’s better suited to people willing to spend ten minutes with a brush and dryer.
Ask for internal layers cut with a curved, not straight, elevation, that curve is what makes each row roll under the next instead of just thinning out the ends.
13. Butterfly Layers and a Deep Swept Fringe for Maximum Coverage on Extra Long Hair
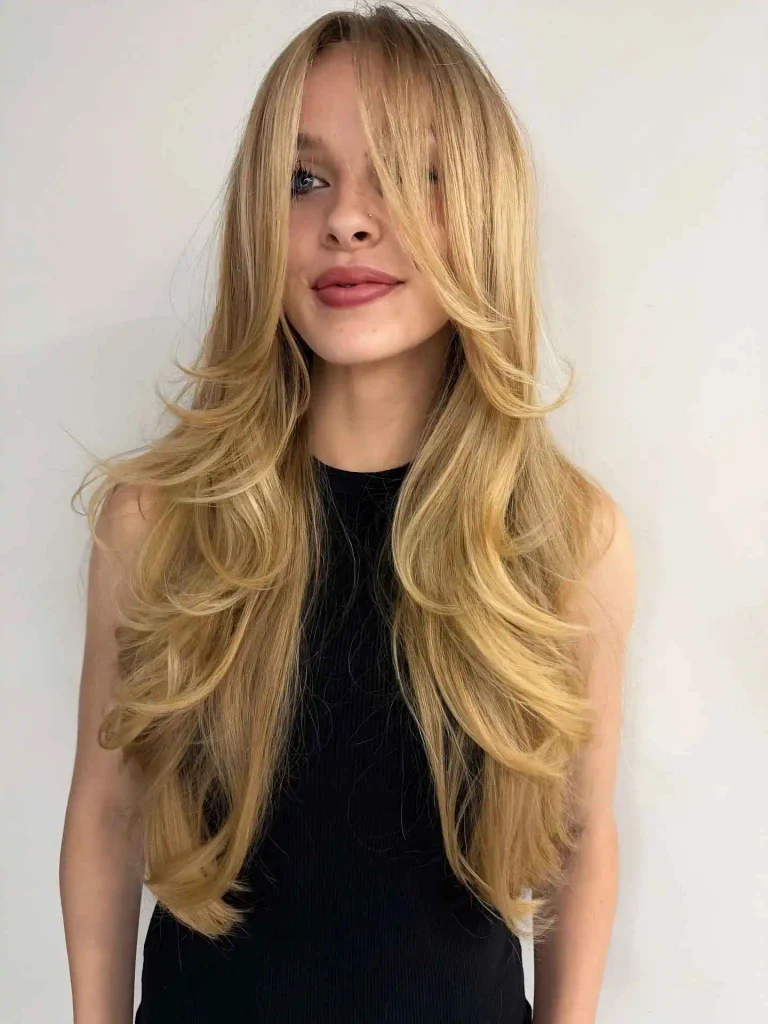
Long hair carries a reputation for making thinning worse, since weight pulls everything flatter the longer it gets. This cut breaks that rule. The fringe is cut long and swept so deeply to one side it nearly covers the eyebrow, hiding the widest part of the hairline entirely. Below that, short internal layers flip out at the jaw, again past the chest, and once more near the ends, a technique often called butterfly layering, so instead of one long uninterrupted sheet of hair, there are multiple points of lift stacked down the whole length.
Golden blonde with subtle lighter pieces woven through helps too. Warmer, dimensional color scatters light instead of letting it pool flat against the scalp the way a single flat tone can.
If you’re growing your hair out and don’t want to lose length, this is proof you don’t have to. The layering does the real work, not the length.
Ask for a deep swept fringe, cut long enough to blend into the layers rather than sit as a separate blunt piece.
Request butterfly layering, short internal layers that flip out at multiple points down the length.
Round brush or wand curl the ends outward at each flip point to activate the shape.
Conclusion:
That’s 13 hairstyles that actually hide thinning hair, all built from real before and afters, real cuts, real color, real texture, no extensions or filters involved. The common thread running through every one is simple: build fullness where it’s needed most instead of chasing some all over fix that doesn’t really exist. Bring one or two of these photos to your stylist, be specific about where you want the lift, and let the layering and color placement do the heavy lifting.
Before your next appointment
Save this for the next time you’re due for a cut and can’t decide what to ask for.